| 일 | 월 | 화 | 수 | 목 | 금 | 토 |
|---|---|---|---|---|---|---|
| 1 | 2 | 3 | 4 | 5 | ||
| 6 | 7 | 8 | 9 | 10 | 11 | 12 |
| 13 | 14 | 15 | 16 | 17 | 18 | 19 |
| 20 | 21 | 22 | 23 | 24 | 25 | 26 |
| 27 | 28 | 29 | 30 |
- Collections
- Pattern
- lambda calculus
- 큐
- JDBC
- 함수형 프로그래밍
- exception
- 자바
- 디자인패턴
- Python
- tcp
- Network
- functional programming
- 파이썬
- Spring
- 스택
- DesignPattern
- Eclipse
- solid
- design-pattern
- Rails
- javscript
- JavaScript
- Java
- 겨울카카오인턴
- 프로그래머스
- Collection
- 로버트마틴
- 백준
- 람다 칼큘러스
- Today
- Total
개발자 노트
Command Pattern 본문
출처
정의
-
behavioral design pattern
- object에 행동을 캡슐화하고, 요청을 캡슐화된 object에 위임하는 디자인 패턴
-
request를 request에 대한 모든 정보를 가지고 있는 stand-alone object로 바꾸는 디자인 패턴
- 이와 같이 변형함으로써 서로 다른 요청에 대해 메서드를 매개변수화할 수 있고, 요청의 실행을 딜레이하거나 큐에 넣을 수 있으며, 원상태로 돌리는 (undoable)작업을 수행할 수 있게 됩니다.
상황 - 텍스트 에디터앱 제작
- 한글, word와 같은 텍스트 에디터앱을 제작하려고 합니다.
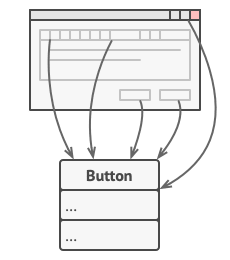
문제
다양한 버튼이 있는 toolbar를 어떻게 만들어야 할까요?
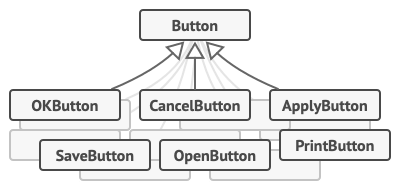
안 좋은 접근 방법 - sub class 생성
방법
각 버튼 클래스가 실행해야할 코드를 가지도록 Button에 대한 서브 클래스를 생성합니다.
문제점
-
수많은 서브클래스가 생성됩니다.
- button클래스가 수정될 때 서브 클래스가 에러날 여지가 있습니다.
-
중복이 발생할 수 있습니다.
- SaveButton, SaveMenuItem, SaveShortcut을 보면 동일한 Save operation이지만, 서로 다른 클래스로 생성하게 됩니다.

해결방법 - layering, delegating
문제의 원인
이는 GUI의 역할과 business logic의 역할이 분리되지 않았기 때문에 발생한 일입니다. SRP를 적용함으로써 이를 해결합니다. 보통 SRP를 적용하는 일은 Layering하는 것과 연결되죠.
방법
Layering
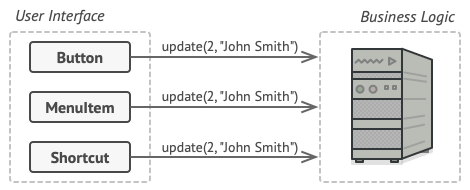
GUI
이미지를 렌더링하고, input값을 받아 해당 요청을 business logic에 파라미터와 함께 요청하고, 그 결과를 보여줍니다.
Business Logic
GUI에서 요청한 business logic을 수행합니다.
Command Pattern
여기서 command Pattern은 더 나아가 GUI가 business logic를 직접 호출하지 않도록 합니다.
구현 절차
-
대신에 detail request를 분리된 commands class로 추출합니다. 해당 요청을 trigger시킬 수 있는 메서드를 지닌 클래스로말이죠. 그리고 이 메서드는 어떤 파라미터도 받지 않습니다.
-
detail request
메서드를 실행할 때 어떤 객체에서, 어떤 메서드에서, 어떤 argument를 넣는 과정을 거치죠. 이 detail request를 의미합니다. (메서드의 3요소라고 불러줄 싶을 정도네요)
-
이렇게 함으로써 command objects는 다양한 GUI와 business logic objects간 연결고리역할을 하게 됩니다.
-
GUI Object는 business logic object를 알 필요없이 적절한 command의 excute 메서드를 실행하면 됩니다.
-
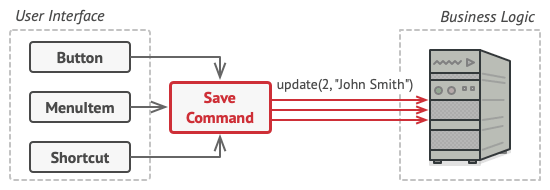
- 다음으로 command를 동일한 인터페이스에서 구현하도록 합니다.
- 이로 얻는 장점은 다음과 같습니다.
- GUI가 특정 command에 의존하지 않게 됩니다.
- 런타임 중에 GUI의 행동을 바꿀 수 있게 됩니다.
- 컨테이너로 담을 수 있습니다.
- 이로 얻는 장점은 다음과 같습니다.
의문 - 파라미터는....?
command의 method엔 파라미터를 받지 않습니다. 그런데 비즈니스 로직을 수행할 땐 파라미터를 넘길 수 밖에 없죠. 어떻게 해야할까요?
사실 이 의문은 [구현-절차 1]의 detail request와 관련이 있습니다. 파라미터 또한 하나의 detail request로 간주합니다. 따라서 business logic method에 들어갈 파라미터를 고려하여 command를 구현하는 클래스생성하는 것이죠. (파라미터가 달라진다면 다른 요청으로 본다는 뜻 같네요.)
따라서 이 예제에서 command pattern을 적용한 구조는 다음과 같습니다.
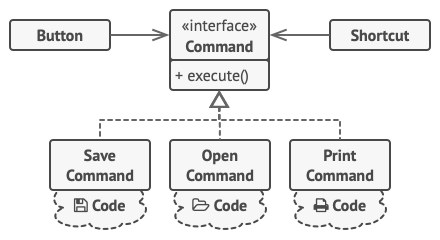
- 여러 sub class를 생성할 필요가 없게 됩니다. 단순히 Button클래스에 command object에 대한 reference만 있으면 됩니다.
- save동작에 대한 버튼들이 중복없이 하나의 save command를 사용할 수 있게 됩니다.
그리고 이 예제의 문제 외로 다음과 같은 이점이 생깁니다.
- Command와 business logic은 composition관계이기 때문에 로깅하거나, 딜레이해주는 작업을 수행할 수 있습니다.
- request를 메서드가 아닌 command object로 변환했기 때문에 쉽게 작업을 취소하고 복구하는 작업을 수행할 수 있게 됩니다.
구조
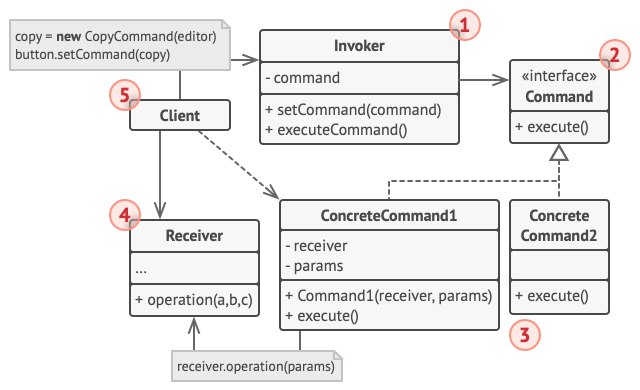
1. Invoker(or Sender)
- request를 initiating하는데 책임이 있습니다. (trigger)
- 반드시 command object를 저장할 수 있는 reference를 지녀야 합니다.
- 직접적으로 요청을 receiver에게 보내기보단, command에게 보내도록 합니다.
- command object를 생성할 책임은 없습니다. 클라이언트에게 command가 정해지도록 합니다.
2. Command(interface)
- single method를 선언합니다.
3. Concrete Commands
- 다양한 요청을 구현하도록 합니다.
- 이때 직접 요청을 수행하기보다는 해당 요청을 business logic에게 전달하도록 합니다.
4. Receiver
- 실제 요청을 수행하는 부분입니다. business logic을 가지고 있다고 봐도 되죠.
5. Client
- command objects를 생성하고 설정하도록 합니다.
- client는 반드시 command constructor에 receiver instance를 생성하기 위한 모든 파라미터를 전달할 수 있도록 합니다.
코드 구현
1. Command
public abstract class Command {
    public Editor editor;
    private String backup;

    Command(Editor editor) {
        this.editor = editor;
    }

    void backup() {
        backup = editor.textField.getText();
    }

    public void undo() {
        editor.textField.setText(backup);
    }

    public abstract boolean execute();
}
2. Copy Command
public class CopyCommand extends Command {

    public CopyCommand(Editor editor) {
        super(editor);
    }

    @Override
    public boolean execute() {
        editor.clipboard = editor.textField.getSelectedText();
        return false;
    }
}
3. Paste Command
public class PasteCommand extends Command {

    public PasteCommand(Editor editor) {
        super(editor);
    }

    @Override
    public boolean execute() {
        if (editor.clipboard == null || editor.clipboard.isEmpty()) return false;

        backup();
        editor.textField.insert(editor.clipboard, editor.textField.getCaretPosition());
        return true;
    }
}
4. Cut Command
public class CutCommand extends Command {

    public CutCommand(Editor editor) {
        super(editor);
    }

    @Override
    public boolean execute() {
        if (editor.textField.getSelectedText().isEmpty()) return false;

        backup();
        String source = editor.textField.getText();
        editor.clipboard = editor.textField.getSelectedText();
        editor.textField.setText(cutString(source));
        return true;
    }

    private String cutString(String source) {
        String start = source.substring(0, editor.textField.getSelectionStart());
        String end = source.substring(editor.textField.getSelectionEnd());
        return start + end;
    }
}
5. Command History
public class CommandHistory {
    private Stack<Command> history = new Stack<>();

    public void push(Command c) {
        history.push(c);
    }

    public Command pop() {
        return history.pop();
    }

    public boolean isEmpty() { return history.isEmpty(); }
}
6. Editor
public class Editor {
    public JTextArea textField;
    public String clipboard;
    private CommandHistory history = new CommandHistory();

    public void init() {
        JFrame frame = new JFrame("Text editor (type & use buttons, Luke!)");
        JPanel content = new JPanel();
        frame.setContentPane(content);
        frame.setDefaultCloseOperation(WindowConstants.EXIT_ON_CLOSE);
        content.setLayout(new BoxLayout(content, BoxLayout.Y_AXIS));
        textField = new JTextArea();
        textField.setLineWrap(true);
        content.add(textField);
        JPanel buttons = new JPanel(new FlowLayout(FlowLayout.CENTER));
        JButton ctrlC = new JButton("Ctrl+C");
        JButton ctrlX = new JButton("Ctrl+X");
        JButton ctrlV = new JButton("Ctrl+V");
        JButton ctrlZ = new JButton("Ctrl+Z");
        Editor editor = this;
        ctrlC.addActionListener(new ActionListener() {
            @Override
            public void actionPerformed(ActionEvent e) {
                executeCommand(new CopyCommand(editor));
            }
        });
        ctrlX.addActionListener(new ActionListener() {
            @Override
            public void actionPerformed(ActionEvent e) {
                executeCommand(new CutCommand(editor));
            }
        });
        ctrlV.addActionListener(new ActionListener() {
            @Override
            public void actionPerformed(ActionEvent e) {
                executeCommand(new PasteCommand(editor));
            }
        });
        ctrlZ.addActionListener(new ActionListener() {
            @Override
            public void actionPerformed(ActionEvent e) {
                undo();
            }
        });
        buttons.add(ctrlC);
        buttons.add(ctrlX);
        buttons.add(ctrlV);
        buttons.add(ctrlZ);
        content.add(buttons);
        frame.setSize(450, 200);
        frame.setLocationRelativeTo(null);
        frame.setVisible(true);
    }

    private void executeCommand(Command command) {
        if (command.execute()) {
            history.push(command);
        }
    }

    private void undo() {
        if (history.isEmpty()) return;

        Command command = history.pop();
        if (command != null) {
            command.undo();
        }
    }
}
7. Client
public class Demo {
    public static void main(String[] args) {
        Editor editor = new Editor();
        editor.init();
    }
}'디자인패턴 > Behavioral Design Pattern' 카테고리의 다른 글
| Memento Pattern (0) | 2020.10.12 |
|---|---|
| Mediator Pattern (0) | 2020.10.12 |
| Iterator Pattern (0) | 2020.10.12 |
| Chain Of Responsibility Pattern (0) | 2020.10.12 |
| behavioral design pattern이란? (0) | 2020.10.12 |
